Running a business comes with its fair share of challenges. From finding your niche to overseeing everyday operations, it’s no simple ordeal. And without a plan for it all, it’s easy to get overwhelmed. As Benjamin Franklin first expressed years ago, “Fail to plan and you plan to fail.”
Thus, planning stands out as a great way for businesses to ensure their success. TextP2P is now here to help. As the ultimate all-in-one messaging platform, we want to ensure that your message gets out how you want it, when you want it, and to whom you want it. Thus, TextP2P is releasing our all-new visual calendar feature!
Whether you’re meeting with new leads and clients or setting up appointments with existing customers, the calendar is perfect for you! Use the calendar to schedule events, set up personal and invitee reminders, and view it all with color to match! Let’s jump right in.
Table of Contents
How It Works
Dr. Lewis runs a private pediatrician’s office, and she wants to use TextP2P to help keep track of her meetings and appointments. Here’s what she does.
First, she creates a few text and email templates. She will use these to send out reminders to her patients and coworkers. She makes use of the existing personalization fields, and some new ones, to create some great templates.

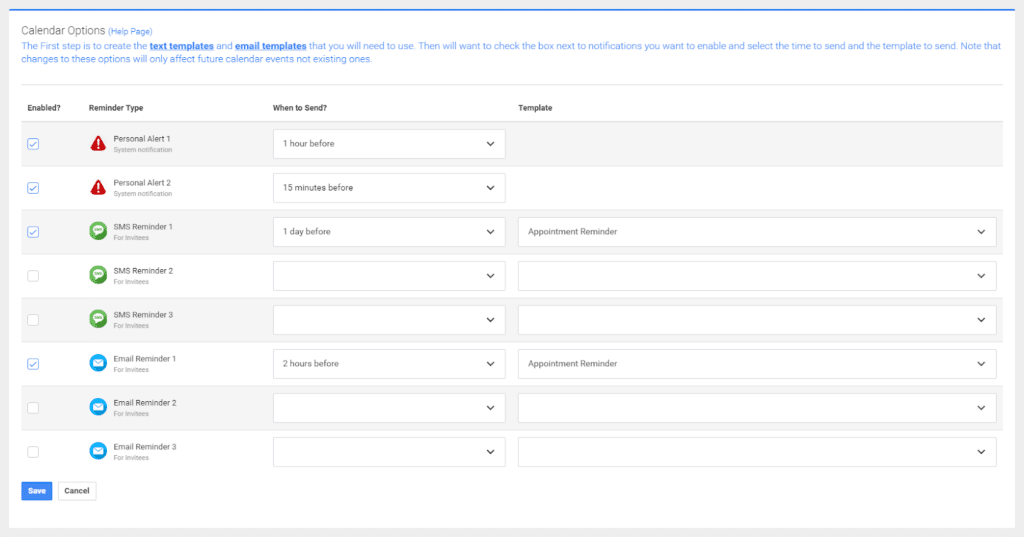
Second, she sets up her calendar reminders. Based on her choices, specific reminders will be sent out at specific times to specific people.
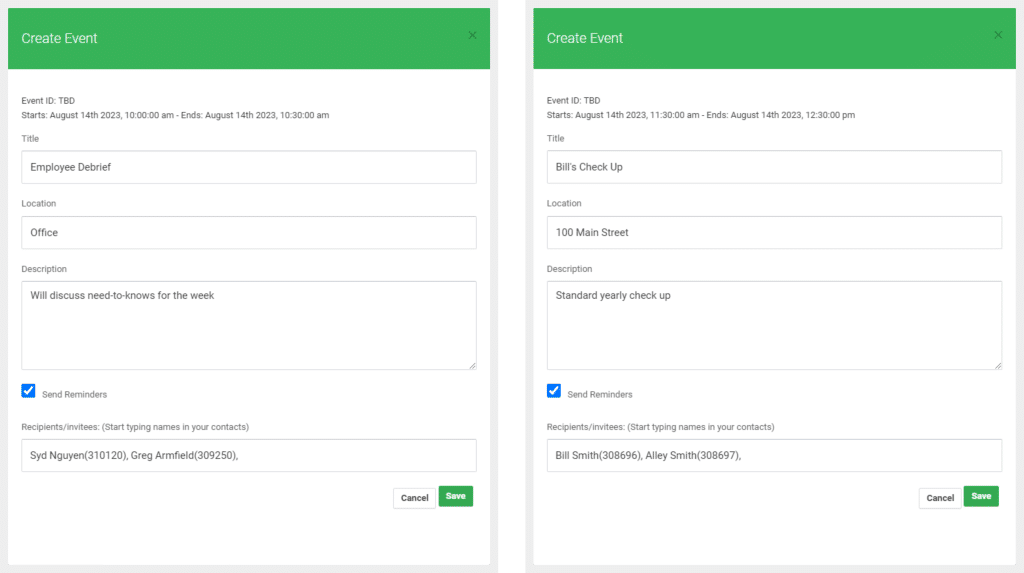
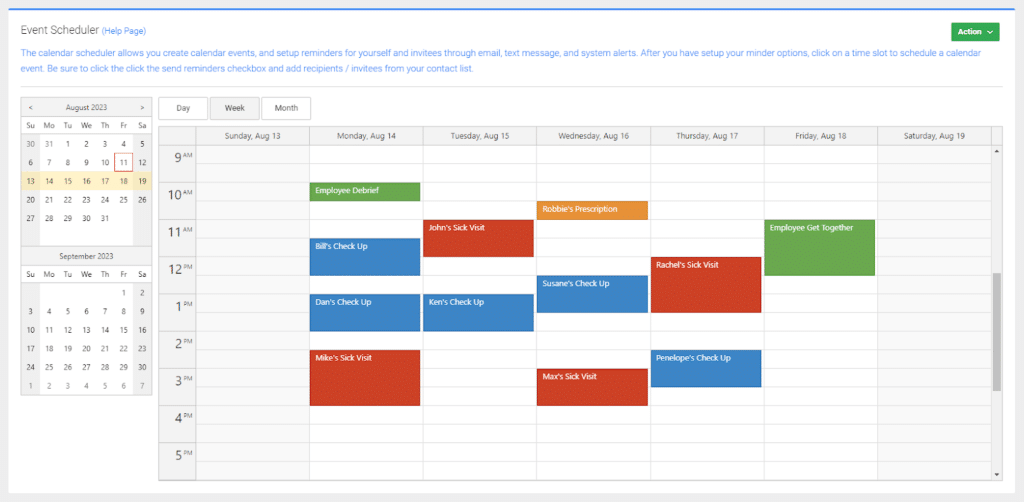
Third, she schedules her events. Between weekly employee debriefs and daily patient appointments, Dr. Lewis has a lot to manage. So, she makes use of the description, location, and color features of the visual calendar to stay organized. For each event that she schedules, she also makes sure to input the invitees, so that they can all receive reminders too. For the debriefs, she invites her coworkers; and for the appointments, she invites the patients and their families.
And that’s it! Now, before every scheduled event, custom reminders will be sent out to Dr. Lewis and whoever she’s chosen as invitees!
The visual calendar isn’t just great for medical professionals, though. Whether you’re a plumber reminding your customers of upcoming repairs or a small business owner sending out shipping updates, a calendar is perfect for you.
Get Started Scheduling Today
Here’s a more detailed explanation of how to use the visual calendar.
First, create your text and email templates.
These will be used to send reminders to event invitees.
- To create a text template, navigate to the Message Templates page (Main to Text Messaging to Message Templates) and click Create Template.
- Fill out all the fields. Be sure to remember the Template Name, and try using personalization fields in the Text Message Body. In addition to [FIRSTNAME], [COMPANY], and the 12 other existing TextP2P personalization fields; the calendar feature also brings with it nine new personalization fields: [EVENTNAME], [START], [STARTDATE], [STARTTIME], [END], [ENDDATE], [ENDTIME], [LOCATION], and [DESCRIPTION]. To learn more about personalization fields, be sure to check out this help article!
- Click Create!
- To create an email template, navigate to the Email Templates page (Main to Email to Email Templates), and click Create Template.
- Fill out all the fields. Once again, be sure to remember the Template Name. For tips on email marketing, be sure to check out this blog article!
- Click Create!
❕ Tip: If you need help creating templates, we have a whole blog article dedicated to just that. Click here to check out 18 Customizable Templates for Business Reminder Messages! From easy copy-and-paste buttons to edit-and-update fields to tips and tricks for templates, we’ve got you covered.
Second, configure your reminders.
For each event that you schedule on your calendar, a series of reminders will be sent out. Two reminders will be sent to you via the TextP2P system, three reminders will be sent to invitees via text, and three more reminders will be sent to invitees via email. If you don’t want all these reminders, you always have the option to disable them.
- Navigate to the Event Options page (Main to Calendar to Event Options).
- Under Enabled?, check the reminders that you would like to send out. When personal alerts are checked, you will receive alerts in the TextP2P system (on your computer and app). When SMS reminders are checked, invitees will receive text messages before events happen. Similarly, when Email reminders are checked, invitees will receive emails.
- Under When to Send?, fill out the dropdowns for all enabled reminders. This is the amount of time before each scheduled event that reminders will be sent out.
- Under Template, fill out the dropdowns for all enabled reminders. This is the text message or email that will be sent to invitees before events.
- Click Save! Ensure you see the message reading “Success: Calendar Options Successfully updated.”
Third, schedule your events!
There’s no limit to how many you can have!
- Navigate to the Event Scheduler page (Main to Calendar to Event Scheduler).
- On the right side, click on a time slot box for whenever your event happens. You can also click and drag over multiple time slots.
- In the box that comes up, fill out the Title, Description, and Location fields.
- If you want reminders to be sent regarding your event, check the Send Reminders box. When this is checked, the reminders enabled in the Event Options page will be sent leading up to when your event is scheduled.
- If the Send Reminders box is checked, also fill out the Recipients/Invitees field. Simply start typing names of your contacts, and their contact information should show up below the box. Then, click on the listed contact to add them.
- Click Save! Repeat this for as many events as you want! Or, try uploading a CSV. For more info, keep reading.
More Calendar Features
Check out more things you can do once events are added to visual calendar:
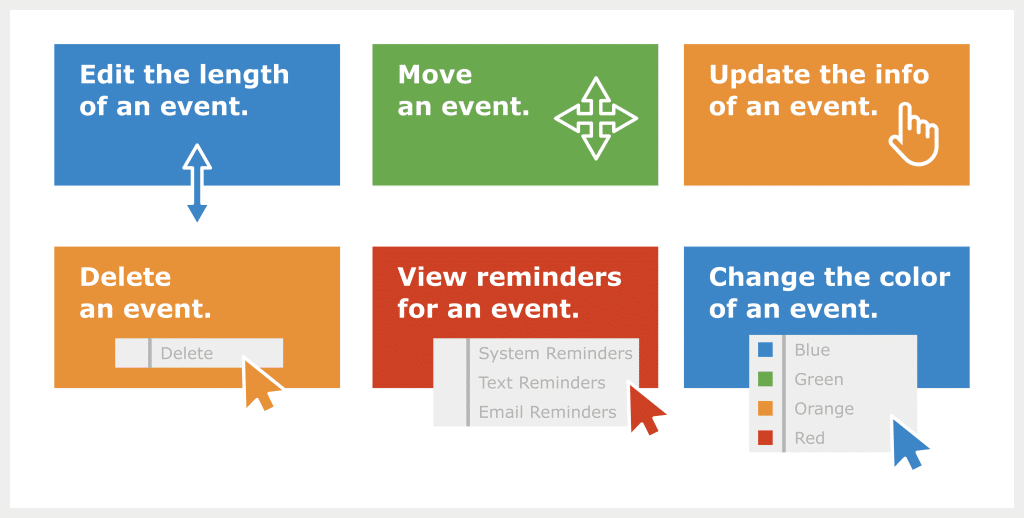
- Edit the length of an event. Click and drag at the bottom of an event to change how long it lasts.
- Move an event. Click and drag on a event to move it to a different timeslot. All the reminders linked to this event will automatically be adjusted.
- Update the information of an event. Click on the event and edit the fields in the box that appears.
- Delete an event. Hover over an event and click on the three lines that appear in the top right. Click on Delete.
- View the reminders for an event. Hover over an event and click on the three lines that appear in the top right. Click on System Reminders, Text Reminders, or Email Reminders. These reminders are based on your selections on the Event Options page.
- Change the color of an event. Hover over an event and click on the three lines that appear in the top right. Click on the color that you want your event to be.
To add events in bulk, you can also upload CSV files.
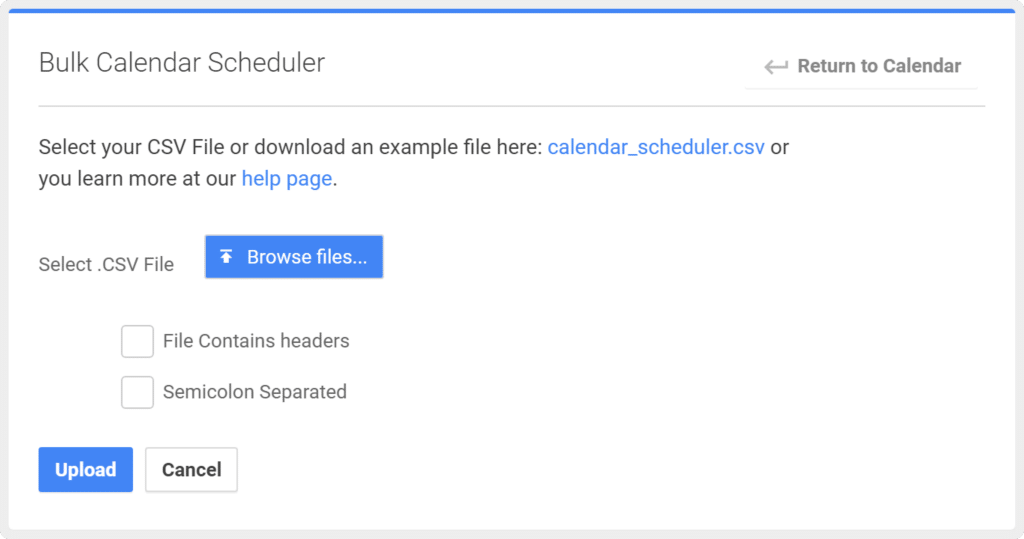
- Navigate to the Event Scheduler page (Main to Calendar to Event Scheduler).
- Click on Action in the top right. Then, click on CSV Upload.
- Download the calendar_scheduler.csv file, and add the information for your events.
- Upload the edited CSV using the Browse files button.
- Click Upload.
Integrate your online calendar
Through Zapier you can integrate your online calendar (Google Calendar, iCloud Calendar, Yahoo Calendar, Outlook Calendar, etc.) with TextP2P’s visual calendar. With this, every event that you create in Google, or whatever it may be, will automatically create an event in TextP2P. For more information on Zapier integrations, be sure to check out our help page! Also, if you’re looking for more explanation on the visual calendar, don’t hesitate to visit our newest help page.
